DISCLOSURE: THIS POST MAY CONTAIN AFFILIATE LINKS, WHICH MEANS WE MAY RECEIVE A COMMISSION IF YOU CLICK A LINK AND PURCHASE SOMETHING. PLEASE CHECK OUT OUR DISCLOSURE POLICY FOR MORE DETAILS.
One question you may ask yourself while watching our “How To” video – why only a 750GB, 5400RPM drive? Why not use a 1TB drive, or a faster drive? The answer is as of this writing, all 2.5 SATA drives 1TB or higher utilize a dual-platter, 12mm form factor that is too big to fit inside your PS3’s drive bay. Using a drive bigger than 9.5mm would require modifications to your drive bay with a Dremel hand-held rotary tool and honestly, we’d rather use a drive that fits than cut into our PS3 to make one fit. The PS3 does not utilize data transfer faster than SATA-150 (1.5Gb/sec) so any of the newer, faster drives that run 3.0Gb/sec or even 6.0Gb/sec would just be a waste. 2.5 SATA drives that run faster than 5400RPM (i.e. 7200RPM) generate more internal heat than Sony recommends, and lastly SSD drives in the 512GB range easily run over $1200 making them cost prohibitive. Researching this subject we determined that the Western Digital 750 GB Scorpio Blue SATA 5400 RPM 8 MB Cache Notebook Hard Drive (WD7500BPVT) is the perfect drive to upgrade your Playstation3 Slim.
WARNING: We are not responsible for any lost data, damages, or errors which result in misconfiguration of your PS3 system. Replacing your hard drive could possibly void your warranty – we do not recommend voiding your warranty. PROCEED AT YOUR OWN RISK – IF YOU BORK YOUR PS3 WE CAN NOT HELP YOU. This “how to” probably doesn’t even work and should be used by absolutely no one.
What You Need to Begin
A PS3 Slim
A Western Digital 750GB, 9.5mm, 5400RPM, 2.5″ notebook SATA-150 (1.5Gb/sec) hard drive
POWER A Media Expansion Bar for PS3 Slim
TRON Legacy PS3 Slim Powerstation 400 – Clean Power & Charging Station for PS3
A small Philips screwdriver
A well-lit work area.
Video
Steps To Upgrade Your Playstation3 Slim’s Hard Drive
1) BACK UP YOUR DATA to an external USB drive as shown in Part 1.
2) Working on a grounded surface, carefully flip your PS3 Slim over.
3) Using your fingernail, lift the screw cover on the bottom of the unit.
4) Using a small Phillip’s screwdriver gently unscrew the single, blue screw underneath the screw cover.
5) Remove the bay cover on the front.
6) Lift the drive latch and gently slide your PS3’s hard drive out.
7) Remove the four small screws holding the PS3 hard drive in the drive casing.
8) Lift the old drive from the drive casing.
9) Take your new, Western Digital 750GB hard drive and place it in the drive casing.
10) Screw the four screws back in place, securing the new 750GB drive.
11) Re-insert the drive with the drive label facing upwards, press firmly.
12) Re-insert the slot cover back on the front of the PS3.
13) Screw the original, single blue screw back in.
14) Flip the screw cover back into place.
Steps to install the Power A Media Expansion Bar
1) Connecting the hinge hook to the side of the PS3 Slim, plug the USB port on the Power A Media Extension Bar to the second USB port on your PS3 slim.
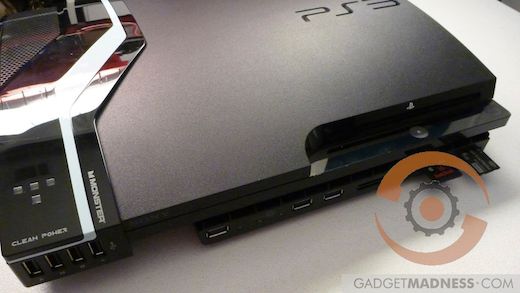
Steps to install the Monster TRON Power Charging Station
1) Slide the base of your PS3 Slim into the Charging Station.
2) Connect the power from the Monster TRON Power Charging Station to your PS3 Slim.
Your PS3 has all the necessary hardware components installed to maximize its full console potential. Once you’ve completed your hardware upgrades, move on to “How To Upgrade Your PS3 Hard Drive With Backup & Restore, Step By Step Instructions – Part 3” to format your new 750GB drive and restore your original PS3 files from backup.


One Comment »